

In this activity, you will build a simple reflective telescope and learn about the use of its mirrors, giving a demonstrative introduction to the topics of light, optics and reflection.
Make a Reflective Telescope
 Brief Description
 Materials
-
Concave mirror (with some magnification)
-
Lens from a small magnifying glass
-
Thick cardboard tube, equal to the focal length of the mirror
-
Two smaller tubes approximately 10 cm long and 2–3 cm in diameter
-
2 cm × 2 cm flat mirror
-
Thin wooden dowel (not rounded) or chopstick with edges
-
Tape measure
-
Double-sided tape
-
Gaffa tape
-
Masking tape
-
Scissors
-
Cardboard cutter
 Learning Objectives
- Build a simple reflective telescope and learn the use of its mirror.
- Learn what light is, how it moves and how we observe it.
- Understand how the telescope works using mirrors and reflection.
 Background Information
What is Light?
Light is a specific type of energy that travels in straight lines and is made up of electromagnetic radiation. Unlike most other forms of energy, light can be detected by the human eye. Light can move very fast, at about 300,000 kilometres per second. Faster than anything else in the Universe. On Earth, the main source of light is the Sun. But light also comes from other sources, such as fires and light bulbs. Regardless of its source, light always travels in straight lines and always at the same speed in open spaces.
Electromagnetic Spectrum
Visible light is just one type of electromagnetic radiation. There are various types, some with longer wavelengths than visible light and some with shorter.
| Electromagnetic Energy | Uses |
| Gamma Rays | Radio therapy, pipe leakage |
| X-rays | Medical scanning (e.g. for broken bones) |
| Ultra Violet (UV) | Security markings |
| Visible Light | Communication |
| Infra Red (IR) | TV remotes |
| Microwaves | Cooking food, satellite communication |
| Radio Waves | Communication |
Colours
Though natural light appears to be white in colour, there are actually several different colours that make up white light. The primary colours of light are red, green and blue, and each colour is composed of a different wavelength. Mixing the primary colours in different ways creates all other colours. When all of the colours are combined, the result is white light. Of the primary colours, red has the longest wavelength and blue, the shortest. Although, the shortest wavelength of all colours is violet. But most objects don't emit their own light, the colour that we see most objects as in our universe is actually composed of the colours of light that the object reflects. For example, an object that appears to be blue reflects blue light and absorbs all of the other colours. Likewise, an object that appears to be red to the human eye, such as an apple, reflects red light and absorbs all of the other colours.
Reflection and Refraction
Reflection occurs when light waves come into contact with an object that has a smooth, shiny surface and bounces off the object. For example, light reflects off of a mirror. Refraction, on the other hand, occurs when light passes through one transparent substance and into another, and bends. An example of refraction is the bending of light that occurs when it passes from air into water.
Sunlight often passes through drops of water in the atmosphere. When this occurs, the light may refract in the water, reflect off the inner surface of the water drop, and then refract as it moves back out into the air. When the first refraction occurs, the light is separated into the colours that compose it. During the second refraction, the separation is intensified. When this series of events is complete, a rainbow is the result.
Reflecting telescopes
Isaac Newton developed the reflector telescope around 1680. Instead of using a lens to gather light, like the refractor telescopes in use at this time, Newton used a curved, metal mirror (primary mirror) to collect the light and reflect it to a focus point. Newton placed the primary mirror in the back of the tube. The mirror reflected light back into the tube, so he placed a small, flat mirror (secondary mirror) in the focal path of the primary mirror to deflect the image out through the side of the tube, to the eyepiece. You might think that the secondary mirror would block some of the image, but it is very small compared to the primary mirror, which is gathering a great deal of light, so the smaller mirror will not block the image. The Newtonian reflector was a highly successful design, and remains one of the most popular telescope designs in use today.
 Full Activity Description
Step 1
First we need to know the ‘focal length’ or ‘focal distance’ of the concave mirror. Go outside on a sunny day and find a spot with the Sun in front of you. Prop up a piece of white paper in front of you (Image 2)

Step 2
Hold your mirror until it catches the sunlight and reflects it onto your paper. DO NOT look at the light directly reflected in your mirror. If you look at your piece of paper you will notice how the reflected heat of the Sun can actually burn a hole in the paper. This is why we NEVER look at the Sun. (Image 3)
Step 3
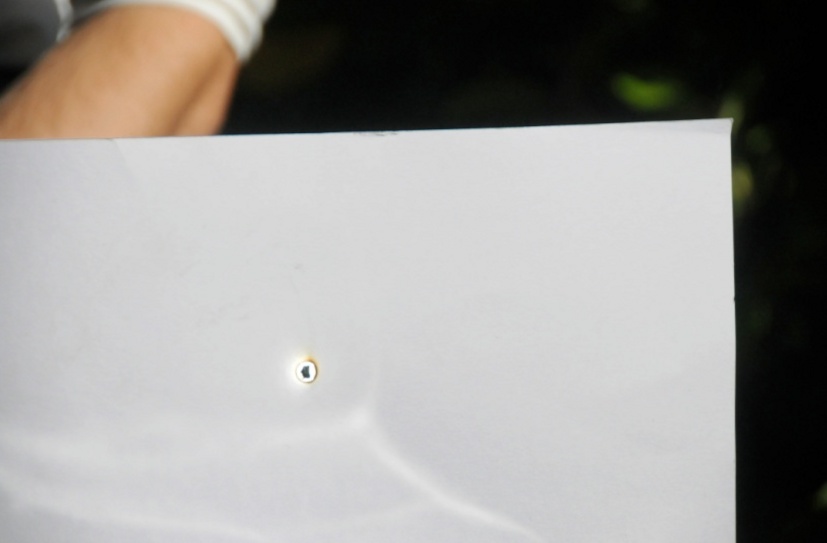
Adjust your mirror until you can see the sunlight focussed on a very fine point on your paper. The distance between the mirror and the paper at this point is the ‘focal length’.
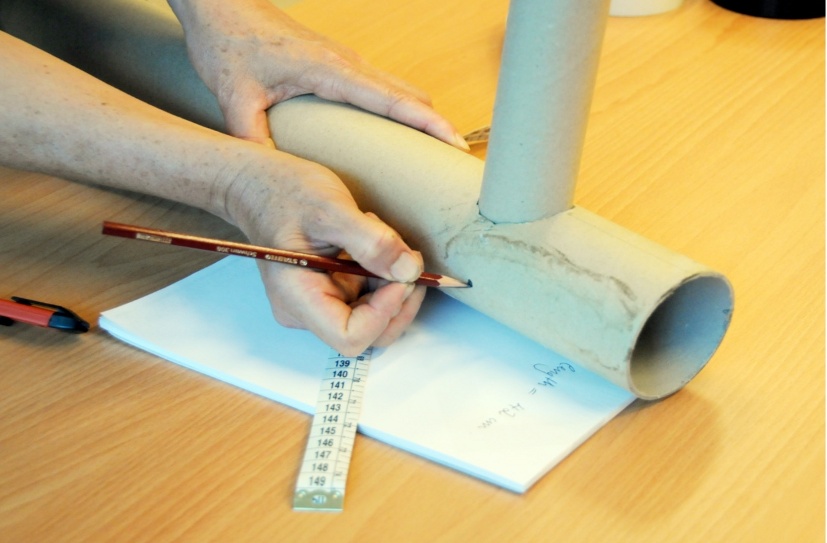
Step 4
Ask a friend to measure it with a tape measure and write down the focal length (Image 4).

Step 5
Find a cardboard tube with a diameter similar to that of your concave mirror. It must also be at least as long as the focal length you have just measured. (Image 5)

Step 6
Fix the concave mirror in one of the tube ends with its mirrored surface turned inwards. (Images 6)

Step 7
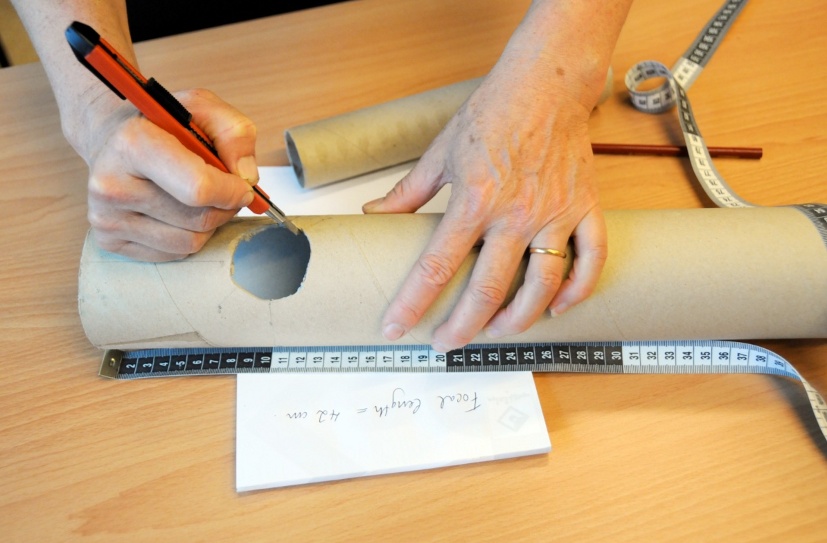
Make a mark on the tube that measures 10 cm from the position of the mirror. This should, of course, be shorter than the entire focal length.
Step 8
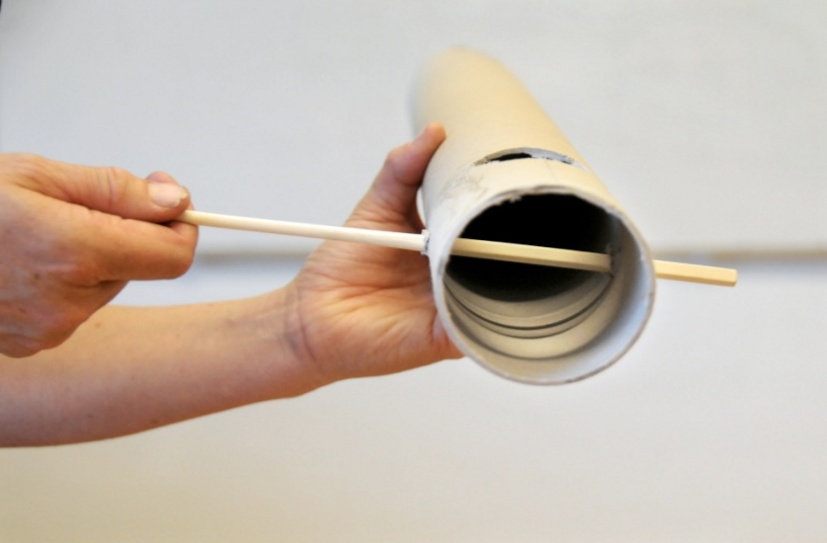
Make a hole at the 10-cm mark with a diameter equal to your smaller cardboard tube. This will be where you place the ‘ocular’, or eyepiece. (Image 7)

Step 9
From the top of the ocular hole, trace a line 90° downwards and mark the point. Do the same on the other side. (Image 8)

Step 10
Make a small hole at each of these points and poke the thin piece of wood all the way through both. It is important that the rod is not smooth, but has an edge. (Images 9)
Step 11
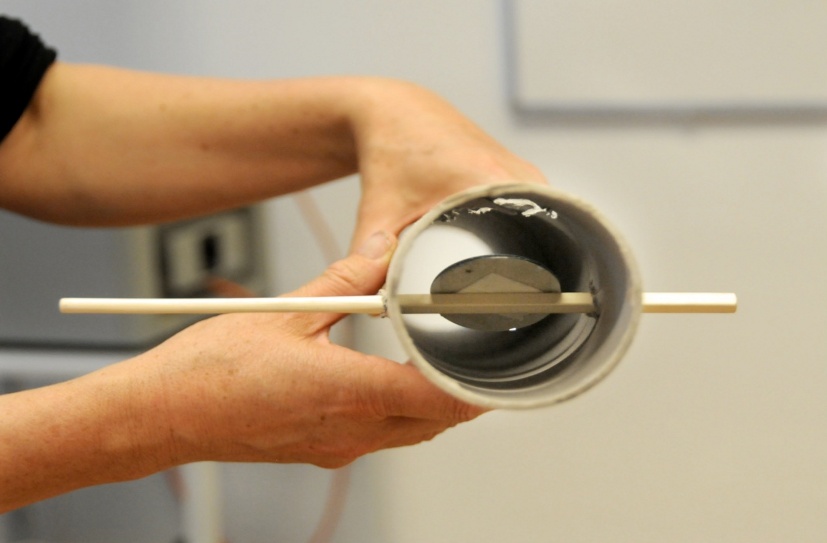
Put some double-sided tape on the back of the flat mirror and introduce it through the ocular hole. Attach it to the chopstick or dowel so that it sits at a 45° angle with the diameter of the large tube. This way, it will deflect the rays coming from the concave mirror and pass them to the small ocular. (Image 10)
Step 12
Make your ocular (or 'eyepiece') in the following way. Fact: this is exactly the same way you would make the eyepiece in a refractory telescope.
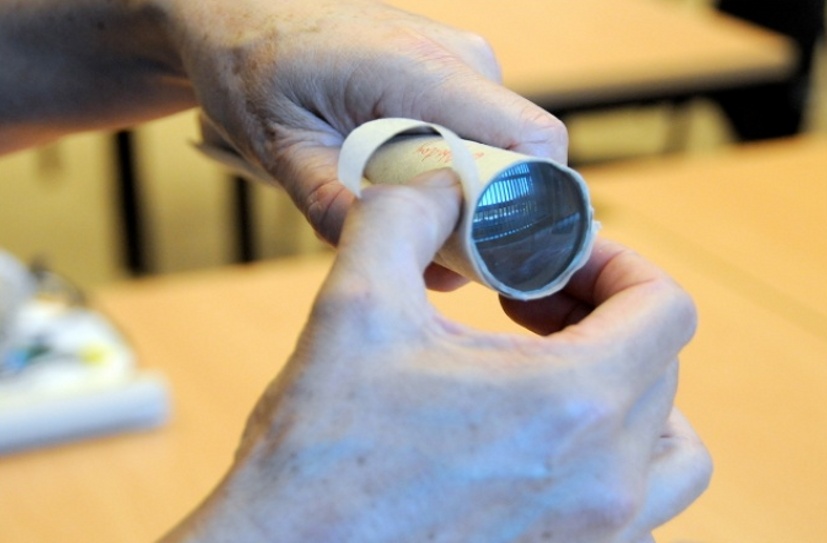
Step 13
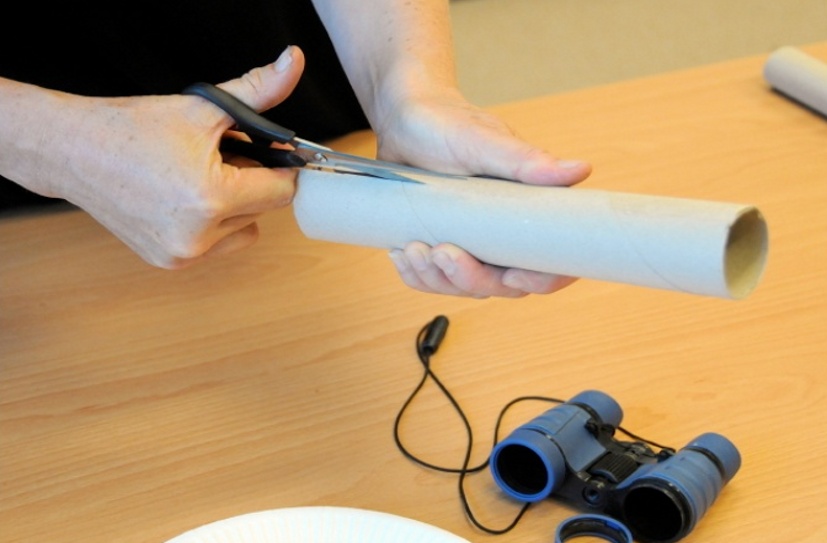
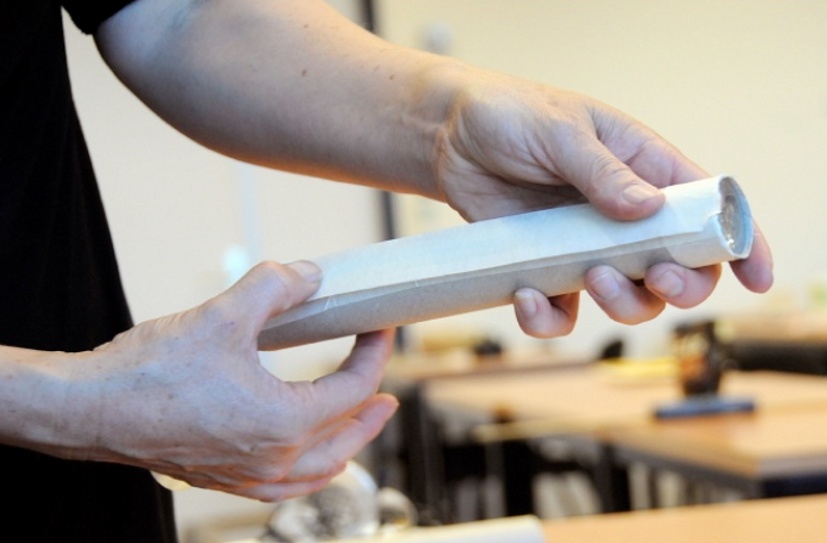
First, cut along the entire length of one of the tubes. This is Tube #1. (Image 11)
Step 14
Hold the tube directly over the magnifying glass lens. (Image 12)

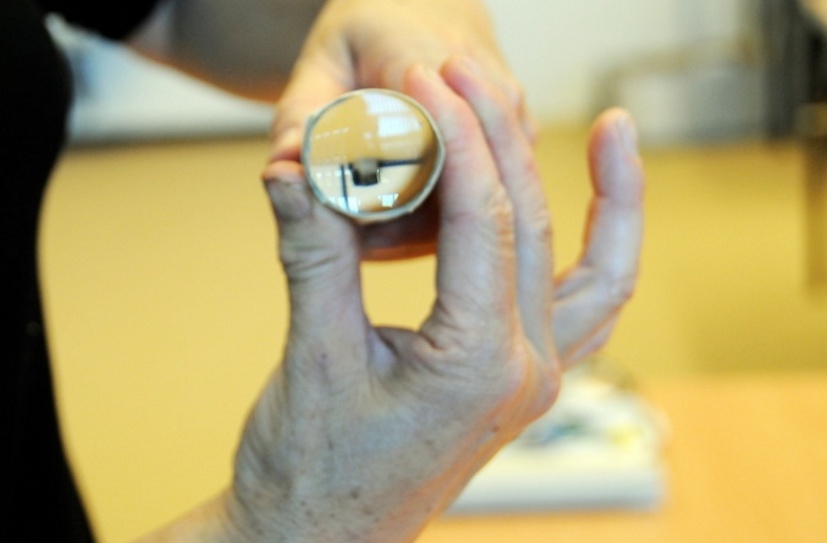
Step 15
Next, grip the tube tightly, making the cut edges overlap, so that the lens is held in place and attach it securely, taping around the lens. (Image 13)

Step 16
Put Tube #1 inside the second tube and check to see that it slides easily up and down. The small tube must be able to slide in and out neatly for you to focus the final image. Once you are sure that the lens in Tube #1 is secure and that the tube can move snugly inside the second tube (the tube that is not cut), tape all along the cut border. (Image 14)
Step 17
This will be your eyepiece; the part that you will observe with. (Image 15)
Step 18
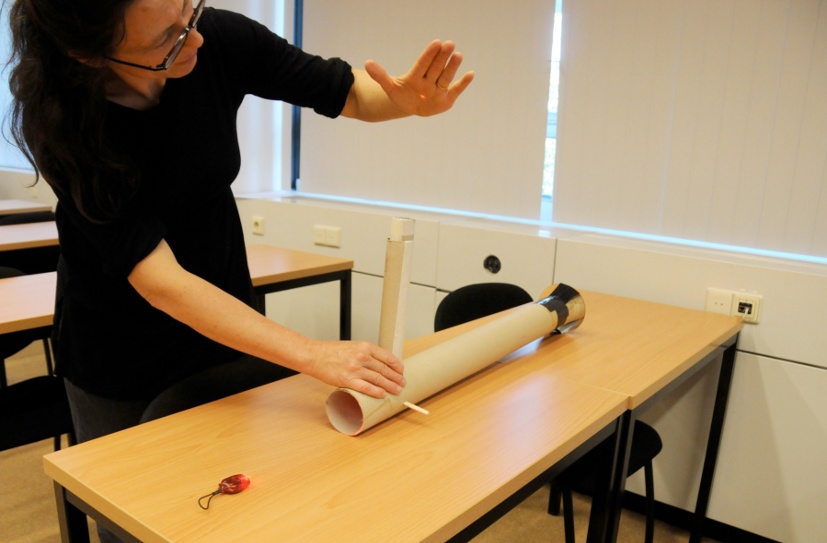
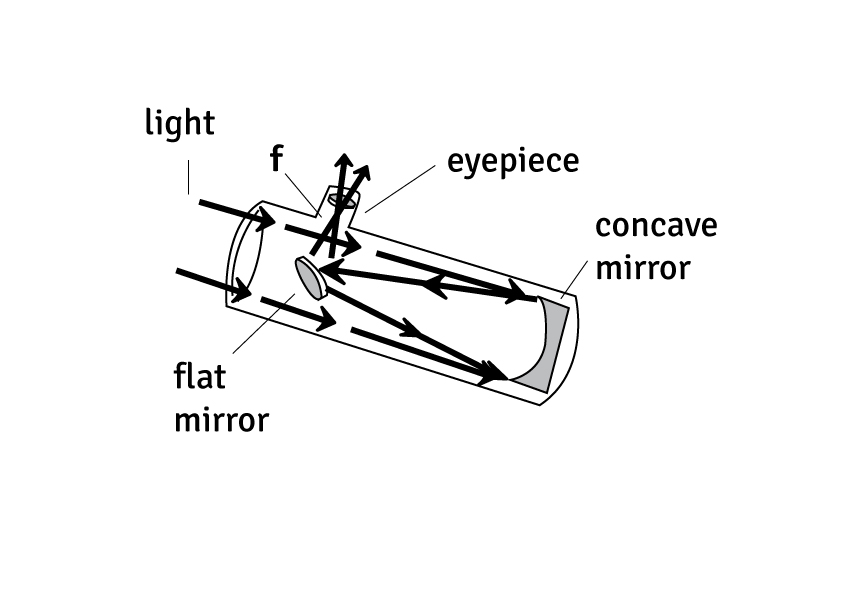
Direct the telescope towards an object and observe it by looking through the small tube. Move the ocular back and forth until you see the object focused. In the picture below, imagine that the small red light is a star or a planet! Its light is collected by the concave mirror which reflects it back onto the flat mirror which, in turn, reflects it onto the hand! (Image 16)
 Keywords
 Connection to National Curriculum
 Source
 License
 Attachments
 Downloads

